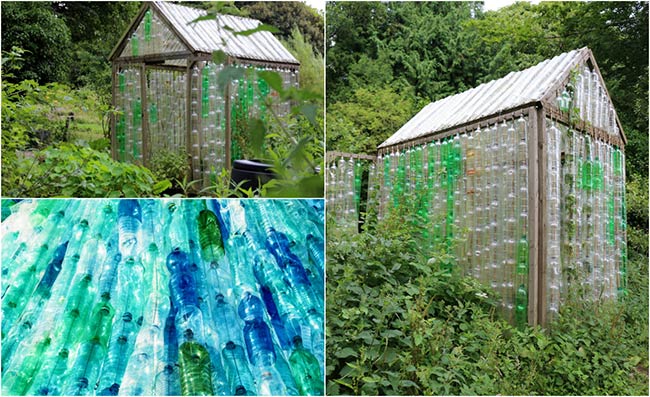
Plastic Bottle Greenhouse Build Guide

Make sure to like Living Green and Frugally on Facebook, Shop at amazon to help support my site and explore our PINTEREST BOARDS for innovative ways you can become self-sufficient.
Build Your Own Plastic Bottle Greenhouse in Eight Easy Steps
Constructing a plastic bottle greenhouse is a fantastic way to recycle and create a sustainable environment for growing your plants. Here’s a step-by-step guide to help you build one using around 1,500 used 2-liter plastic bottles. you can refer to the Plastic Bottle Greenhouse Instructions PDF. This resource provides comprehensive instructions and illustrations to assist you throughout the building process.
Step 1: Collect and Prepare Bottles
Start by gathering approximately 1,500 used plastic bottles, ideally 2-liter ones. Clean them thoroughly in a bucket of soapy water and remove all labels. Cut off the bottoms of the bottles with sharp scissors, being careful to avoid injury. This step can be time-consuming and may cause blisters, so it’s best suited for older children or adults with supervision.
Step 2: Set Up Corner Posts
For the greenhouse structure, you’ll need four treated 4” x 4” posts. These should be cemented into the ground about two feet deep to provide sturdy support for your greenhouse. Lay down slabs or mulch around and inside the greenhouse area to suppress weeds. This task is best handled by adults.
Step 3: Construct Frames
Create frames for each side of the greenhouse, including the roof and door. Use treated 2” x 2” timber with mitred corners, secured together with screws. This step can involve older children under supervision but generally requires adult oversight due to the precision needed.
Step 4: Assemble Bottle Columns
Stack the prepared plastic bottles one inside another, inserting a garden cane through the middle for support. Reverse one bottle at the end of each stack to ensure they fit snugly. These columns will form the walls of the greenhouse. Children can help with this under minimum supervision.
Step 5: Attach Bottles to Frames
Using fencing staples, attach both ends of the garden cane to the frames, ensuring the bottles are squashed together tightly. Fill the frame with as many bottle rows as possible. Children can assist with this task with minimal supervision.
Step 6: Erect the Greenhouse
Screw the completed bottle-filled frames onto the upright posts. This step is crucial for the stability of the structure and should be done by adults.
Step 7: Construct the Roof
The roof can be either flat or sloping. For a sloping roof, create two triangular frames for the gables and staple bottles to these frames as before. Secure the triangular gables to the posts and add a top beam and vertical supports. Finally, attach the roof panels made from bottle-filled frames. This step is best handled by adults and older children.
Step 8: Build the Door
Construct the door using a smaller frame hinged to the larger front wall frame. Ensure the door is slightly smaller than the frame to allow it to open freely even if it sags over time. This step is best suited for adults and older children.
Once your greenhouse is assembled, you’re ready to start planting! This eco-friendly project not only helps the environment by recycling plastic bottles but also provides a functional space for growing flowers, vegetables, and other plants.
Materials and Tools List
Materials:
- 4” x 4” Posts: 4 @ 8 feet long
- 2” x 2” Timber:
- Side frames: 4 @ 8 feet, 4 @ 6 feet
- Back frame: 4 @ 6 feet
- Front frame: 4 @ 6 feet
- Front wall and door: 6 @ 6 feet
- Roof sides: 4 @ 8 feet, 4 @ 5 feet
- Top beam: 1 @ 8 feet
- Top gables: 4 @ 5 feet, 2 @ 6 feet
- Gable support: 2 @ 4 feet
- Garden Canes: 6 feet x 140 (approx)
- Hinges for Door
- Screws: 4” for posts (approx. 40), 3” for frame (approx. 100)
- Fencing Staples: Approx. 300
- Postcrete: 4 bags
- Gravel/Slabs/Mulch Matting
- Plastic Bottles: Approx. 1,500
Tools:
- Spirit Level
- Drill
- Mitre Block
- Saws (x2)
- Screwdriver
- Hammer (x3)
- Sharp Scissors
- Bucket of Soapy Water
- Spade
- Pinch Bar
- Measuring Tape
- Stepladders
By following these steps and using the provided materials and tools, you can create a unique and environmentally friendly greenhouse, perfect for nurturing your garden plants.
Additional Resources
For a more detailed guide and additional tips on constructing your plastic bottle greenhouse, you can refer to the Plastic Bottle Greenhouse Instructions PDF. This resource provides comprehensive instructions and illustrations to assist you throughout the building process.