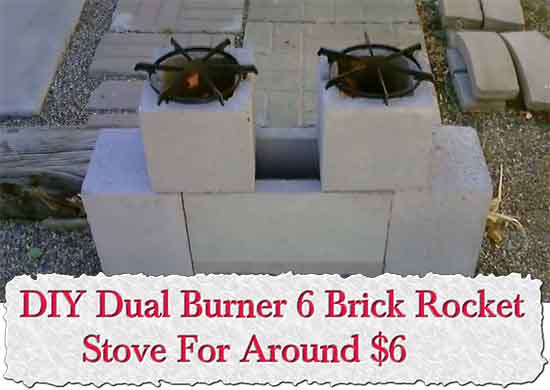
DIY Dual Burner 6 Brick Rocket Stove For Around $6
Make sure to like Living Green and Frugally on Facebook, Shop at Amazon to help support my site and explore our PINTEREST BOARDS for innovative ways you can become self-sufficient.
Rocket stoves are renowned for their energy efficiency and minimal environmental impact. They’re particularly favored for their ability to cook food using minimal fuel. Today, we’ll explore an even more budget-friendly version, the “6 Block” Dual Burner Rocket Stove, designed for use in emergencies, camping, or everyday cooking. The best part? You can build one for around $6.
Materials You’ll Need
To create your DIY Dual Burner 6 Brick Rocket Stove, you will need:
- Six Standard Concrete Blocks: These are readily available at most hardware stores and garden centers. The standard size is 16 inches long, 8 inches wide, and 8 inches high.
- Two Half Concrete Blocks: You can easily obtain half-sized concrete blocks, usually measuring 8 inches long, 8 inches wide, and 8 inches high.
- A Metal Grate or Wire Mesh: To form the grill on which you’ll place your cookware.
- Firewood or Other Combustible Biomass: This stove is highly versatile and can use small twigs, wood pellets, or other biomass materials for fuel.
- A Lightweight Cooking Pot or Pan: Ensure it’s of appropriate size for the cooking you intend to do.
The Build Process
- Prepare Your Work Area: Choose a safe, well-ventilated outdoor space for building and using your rocket stove. Safety should be a priority, as you will be working with fire.
- Position the Standard Blocks: Arrange the six standard concrete blocks in a rectangular shape, placing three on each side, with the open ends facing up. This forms the base and walls of your rocket stove.
- Add the Half Blocks: At the front of your stove, insert the two half concrete blocks. They should fit snugly, creating an opening for the fire chamber and airflow. These are your combustion chambers.
- Place the Metal Grate: Position your metal grate or wire mesh on top of the two half blocks to form a stable cooking surface.
- Light the Stove: Place some kindling or small pieces of wood into the combustion chambers. Light the fire. As the fire burns, the air is drawn in through the bottom, and the hot gases are channeled up through the combustion chambers, creating a strong draft that promotes efficient combustion.
- Cooking: Once your rocket stove is burning well, you can place your cooking pot or pan on the metal grate. Adjust the size of your fire and add fuel as needed to control the heat. The rocket stove’s efficient design allows you to cook with minimal fuel consumption.
Advantages of the Dual Burner Rocket Stove
- Affordability: One of the most significant advantages of this rocket stove is its low cost. With just a few concrete blocks and a metal grate, you can have an effective cooking system for around $6.
- Efficiency: Rocket stoves are renowned for their efficiency. The design ensures that a high percentage of the heat generated from the burning fuel is transferred directly to the cooking pot, reducing the amount of fuel needed.
- Versatility: You can use various types of biomass as fuel, making it adaptable to different situations and environments.
- Reduced Emissions: Rocket stoves produce fewer emissions and smoke than traditional open fires, which is not only better for the environment but also for your health when cooking.
- Ideal for Emergencies: Whether you’re camping, dealing with a power outage, or preparing for a disaster, the DIY Dual Burner Rocket Stove is an excellent choice for emergency cooking.
The DIY Dual Burner 6 Brick Rocket Stove is a cost-effective, efficient, and eco-friendly solution for your cooking needs. With just a handful of readily available materials, you can build this rocket stove and cook your meals using minimal fuel. It’s a versatile cooking tool suitable for outdoor adventures, emergencies, or even everyday use, and it’s an excellent addition to your DIY projects. Plus, at a cost of around $6, it won’t break the bank. So why not give it a try and enjoy efficient, sustainable cooking with your homemade rocket stove?
