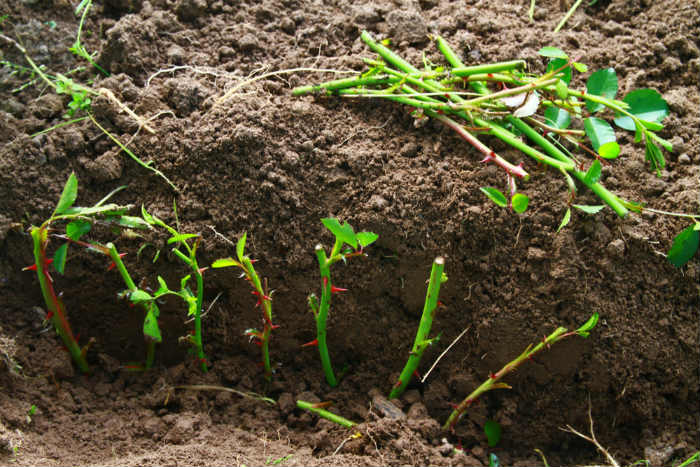
How To Grow Roses From a Cutting

Make sure to like Living Green and Frugally on Facebook, Shop at Amazon to help support my site and explore our PINTEREST BOARDS for innovative ways you can become self-sufficient.
Growing roses from cuttings is a gratifying endeavor that allows you to expand your garden while ensuring genetic continuity with your favorite rose varieties. This method, often employed by seasoned gardeners and beginners alike, offers a cost-effective way to propagate roses with relative ease.
In this comprehensive guide, we’ll walk you through the step-by-step process of growing roses from cuttings, from selecting the right materials to nurturing your fledgling plants into thriving specimens.

Materials Needed:
- Pruning shears or sharp scissors: Ensure clean, precise cuts to minimize the risk of disease.
- Rooting hormone: Facilitates root development on your cuttings and can be found at local garden centers.
- Potting mix: Opt for a well-draining mix suitable for roses, or create your own blend.
- Pots or containers: Use small pots with drainage holes to plant your cuttings.
- Plastic bags or plastic wrap: Create a humid environment by covering the pots.
- Watering can or misting spray bottle: Maintain consistent moisture levels during the rooting phase.

Step 1: Selecting and Preparing the Parent Plant:
Choose a healthy, disease-free rose plant as the source for your cuttings. Select a young, green stem without flowers, ideally 6 to 8 inches long.
Step 2: Taking the Cutting:
- Timing: Take cuttings in the early morning when the plant is hydrated.
- Cutting Technique: Make a clean, diagonal cut just below a leaf node. Remove any flowers, buds, or leaves from the lower part of the cutting.
Step 3: Applying Rooting Hormone:
Dip the cut end of the rose cutting into rooting hormone, ensuring thorough coverage.
Step 4: Planting the Cutting:
- Prepare the Potting Mix: Fill small pots with potting mix, leaving an inch from the top.
- Insert the Cutting: Create a hole in the center of the potting mix and secure the cutting.

Step 5: Providing Optimal Conditions:
- Watering: Keep the soil consistently moist but not waterlogged.
- Covering the Pot: Use plastic bags or wrap to create a greenhouse effect.
- Location: Place the pot in a warm, bright area with indirect sunlight.
Step 6: Monitoring and Transplanting:
- Monitoring Growth: Watch for signs of new growth such as leaves or buds.
- Transplanting: After 8-12 weeks when roots have developed, transplant into larger containers or directly into the garden.
View this post on Instagram
By following these steps, you can successfully grow roses from cuttings, expanding your garden with beautiful blooms and preserving the characteristics of your favorite rose varieties. With patience and care, you’ll soon enjoy the fruits of your propagation efforts as your new rose plants flourish and bloom.
Top Tips for Successful
- Choose Healthy Parent Plants: Select vigorous, disease-free rose plants with desirable traits to serve as the source for your cuttings. Healthy parent plants yield healthy offspring.
- Timing Is Key: Take cuttings during the plant’s active growth phase, typically in the spring or early summer. Avoid taking cuttings from stressed or dormant plants, as they may not root successfully.
- Use the Right Tools: Sharp, clean pruning shears or scissors are essential for making precise cuts. Dull or dirty tools can crush stems, leading to disease transmission and poor rooting.
- Optimal Cutting Size: Aim for cuttings that are 6 to 8 inches long with at least two sets of leaves. Longer cuttings provide more surface area for rooting, while shorter cuttings may struggle to develop roots.
- Proper Cutting Technique: Make diagonal cuts just below a leaf node to maximize the area for root formation. Remove any flowers, buds, or leaves from the lower portion of the cutting to prevent rotting.
- Use Rooting Hormone Wisely: While rooting hormone can enhance root development, avoid excessive use as it may inhibit growth. Follow the manufacturer’s instructions for application carefully.
- Choose the Right Potting Mix: Opt for a well-draining potting mix specifically formulated for roses or create your own blend using peat moss, perlite, and vermiculite. Good drainage is essential to prevent waterlogging and root rot.
- Maintain Consistent Moisture: Keep the potting mix evenly moist but not waterlogged. Overwatering can lead to rotting, while underwatering can hinder root development. Use a misting spray bottle to keep the foliage hydrated without saturating the soil.
- Provide Adequate Light: Place the pots in a bright location with indirect sunlight. Avoid direct sunlight, especially during the hottest part of the day, as it can scorch delicate cuttings.
- Monitor for Pests and Diseases: Keep an eye out for signs of pests or diseases, such as aphids, spider mites, or fungal infections. Promptly address any issues to prevent them from spreading to your cuttings.
- Be Patient: Rooting can take several weeks to several months, depending on environmental conditions and the rose variety. Resist the urge to disturb the cuttings during this time, as it can disrupt root formation.
- Transplant Carefully: When transplanting rooted cuttings into larger containers or the garden, handle them gently to avoid damaging the fragile root system. Water them thoroughly after transplanting to help them establish in their new environment.
By following these tips, you can increase the likelihood of success when growing roses from cuttings and enjoy a bountiful garden filled with your favorite rose varieties. Happy gardening!